Orotracheal Intubation
Indications
1. Inadequate oxygenation (decreased arterial PO2, etc.) that is not corrected by supplemental oxygen supplied by mask or nasal prongs.
2. Inadequate ventilation (increased arterial PCO2).
3. Need to control and remove pulmonary secretions (bronchial toilet).
4. Need to provide airway protection in an obtunded patient or a patient with a depressed gag reflex (for example during a general anesthesia).
Contraindications
The following are only relative contraindications to tracheal intubation:
1. Severe airway trauma or obstruction that does not permit safe passage of an endotracheal tube. Emergency cricothyrotomy is indicated in such cases.
2. Cervical spine injury, in which the need for complete immobilization of the cervical spine makes endotracheal intubation difficult.
Preparing the Procedure
When intubating a patient, there are certain bare essentials that must be present to ensure a safe intubation. They can be remembered by the mnemonic SALT
Suction. This is extremely important. Often patients will have material in the pharynx, making visualization of the vocal cords difficult. Pulmonary Aspiration should be avoided.
Airway. the oral airway is a device that lifts the tongue off the posterior pharynx, often making it easier to mask ventilate a patient. The inability to ventilate a patient is bad. Also a source of O2 with a delivery mechanism (ambu-bag and mask) must be available.
Laryngoscope. This lighted tool is vital to placing an endotracheal tube.
Tube. Endotracheal tubes come in many sizes. In the average adult a size 7.0 or 8.0 oral endotracheal tube will work just fine.
Equipment Required
1. Self-refilling bag-valve combination (eg, Ambu bag) or bag-valve unit (Ayres bag), connector, tubing, and oxygen source. Assemble all items before attempting intubation.
2. Laryngoscope with curved (Macintosh type) and straight (Miller type) blades of a size appropriate for the patient.
3. Endotracheal tubes of several different sizes. Low-pressure, high-flow cuffed balloons are preferred.
4. Oral airways.
5. Tincture of benzoin and precut tape.
6. Introducer (stylets or Magill forceps).
7. Suction apparatus (tonsil tip and catheter suction).
8. Syringe, 10-mL, to inflate the cuff.
9. Mucosal anesthetics (eg, 2% lidocaine)
10. Water-soluble sterile lubricant.
11. Gloves.
Position of the patient
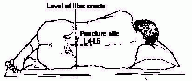
The height of the table where the patient is lied, should be adjusted so that the patient's face is at the level of the xiphoid cartilage of the standing person who is performing the procedure. Elevating the patient's head about 10 cm with pads under the occiput and extension of the head at the atlanto-occipital joint (sniffing position) serve to align the oral, pharyngeal, and laryngeal axis, so that the passage from the lips to the glottic opening is almost a straight line. This position permits better visualization of the glottis and vocal cords and allows easier passage of the endotracheal tube. For children under 1 month of age, the head should be in a neutral position. See Figure 1.
Figure 1:Letter A shows the wrong and letter B shows the correct position of patient's head.
Technique
A. Mask ventilation: (Oxygen delivered with a face mask at a rate of 10-15 L/min.):
1. Select the proper-sized mask; it should cover the mouth and nose and fit snugly against the cheeks.
2. Place the patient in the sniffing position.
3. Place the mask over the patient's mouth and nose with the right hand.
4. With the left hand, place the small and ring fingers under the patient's mandible, and lift up to open the airway. Grasp the mask with the thumb and index finger, and press it to the patient's face while lifting the mandible with the ring and small fingers.
5. Compress the bag with the right hand.
6.The chest should rise with each breath, and airflow should be unimpeded. If not, reposition the mask , and try again. Occasionally, insertion of an oral or nasal airway facilitates ventilation by mask. Because of the lack of support for the lips, elderly edentulous patients may be especially hard to ventilate using a mask.
B. Topical Anesthesia: Anesthetize the mucosa of the oropharynx, and upper airway with lidocaine 2%, if time permits and the patient is awake.
C. Direct Laryngoscopy:
1. Place the patient in the sniffing position.
2. Check the laryngoscope and blade for proper fit, and make sure that the light works.
3. Make sure that all materials are assembled and close at hand.
4. Curved blade technique:
a. Open the patient's mouth with the right hand, and remove any dentures.
b. Grasp the laryngoscope in the left hand as shown in Figure 2.
c. Spread the patient's lips, and insert the blade between the teeth, being careful not to break a tooth.
d. Pass the blade to the right of the tongue, and advance the blade into the hypopharynx, pushing the tongue to the left.
e. Lift the laryngoscope upward and forward, without changing the angle of the blade, to expose the vocal cords. See Figure3.
Figure 2:Technique of direct laryngoscopy and orotracheal intubation.
Figure 3:Curved blade placement in orotracheal intubation.
5. Straight blade technique:
Follow the steps outlined for curved blade technique, but advance the blade down the hypopharynx, and lift the epiglottis with the tip of the blade to expose the vocal cords. The tip of the laryngoscope blade fits below the epiglottis, which is no longer visible with the blade in position.See Figure 4.
Figure 4:Straight blade placement in orotracheal intubation.
D. Orotracheal Intubation:
1. Select the proper-sized tube.
2. With the 10-mL syringe, inflate the balloon with 5-8 mL of air. Make sure that the balloon is functional and intact.
3. Lubricate the end of the tube (optional).
4. Insert the stylet, and bend the tube and stylet gently into a crescent shape so that the tip of the stylet is at least 1 cm proximal to the end of the tube.
5. Ventilate the patient with the bag-valve combination for 1-2 minutes with 100% oxygen.
6. Proced the direct laryngoscopy (as explained above), and when visualizing the glottis and vocal cords (Figure 5), gently pass the tube next the laryngoscope blade through the vocal cords into trachea, far enough so that the balloon is just beyond the cords. Occasionally, gently pressing posteriorly on the anterior neck at the level of the larynx will help to bring an anteriorly placed larynx into view and facilitate intubation.
7. Withdraw the stylet.
8. Connect the bag-valve combination, and begin ventilation with 100% oxygen.
9. Confirm that the tube is properly positioned. First, listen over the stomach with a stethoscope while ventilating the patient. If sounds of airflow are heard or if distension of the stomach occurs, the tube is in the esophagus. If the esophagus has been intubated instead of the trachea, remove the tube and try again.
10. Listen to each side of the chest, be sure that breath sounds are equal in both sides of the thorax. If not, reposition the tube. When breath sounds are equal on both sides and the thorax rises equally on both sides with each inspiration, note the position of the tube (mark the tube at patient's mouth), and inflate the cuff with the 10-mL syringe until there is no air leak around the tube when positive pressure is applied.
11. Apply tincture of benzoin to the cheeks, upper lip, and endotracheal tube.
12. Wrap adhesive tape around the tube where it comes out of the mouth. Then carry the tape over the cheek and around the back of the head onto the other cheek. Fasten the end of the tape around the tube.
13. Obtain a chest x-ray film immediately to check tube placement, and also obtain arterial blood gas measurements to assess the adequacy of ventilation.
Figure 5: View of glottis and vocal cords in direct laryngoscopy.
Bibliography
Charles E. Saunders, Mary T. Ho(eds): In Current Emergency Diagnosis and Treatment. Fourth edition, 1992.
Barash PG , Cullen BF, Stoelting RK [eds]: Clinical Anesthesia. Philadelphia, JB Lippincott, 1992.
Davison JK, Eckardt IIIWF, Perese DA [eds]: Clinical Anesthesia Procedures of the Massachusetts General Hospital. Little Brown, 1993.
Duke J, Rosemberg SG [eds]: Anesthesia Secrets. Hanley & Belfus, 1996.